
Moving from Ubivox to MiniCRM GoBIG
Overview
Ubivox stops working for one.com customers on 31 December 2026. Your contacts, data fields and lists don’t have to disappear with it. MiniCRM, part of group.one like one.com, is the recommended alternative, and this guide helps you move your data into it. MiniCRM is already built into one.com Website Builder and Webmail, so you can open it from either.
What you need
- Admin access to Ubivox (until 31 December)
- Your one.com Website Builder or Webmail login
- A Gmail (Google Workspace) or Outlook (Microsoft 365) mailbox
Export your data early. Once Ubivox is switched off, your contacts can no longer be retrieved.
You already know most of it
Most Ubivox concepts have a direct equivalent in MiniCRM, just under a different name.
| In Ubivox | In MiniCRM | Notes |
|---|---|---|
| Contacts / subscriptions | Customers | Each contact becomes a customer record |
| Data field | Data field | Created automatically during the import |
| Lists | Saved filters | A saved filter is a reusable list of customers |
| Segmentation | Filters | Build conditions on any field, or describe them in plain words to Aida |
| Subscriptions | A data field | For example a “Newsletter” checkbox you can filter on |
| Courses | Automations | Emails and tasks that run on their own based on rules |
| Templates | Templates | Customers > Templates |
Step 1 – Open MiniCRM
Open MiniCRM from Website Builder or from Webmail; both lead to the same MiniCRM account.
From Website Builder
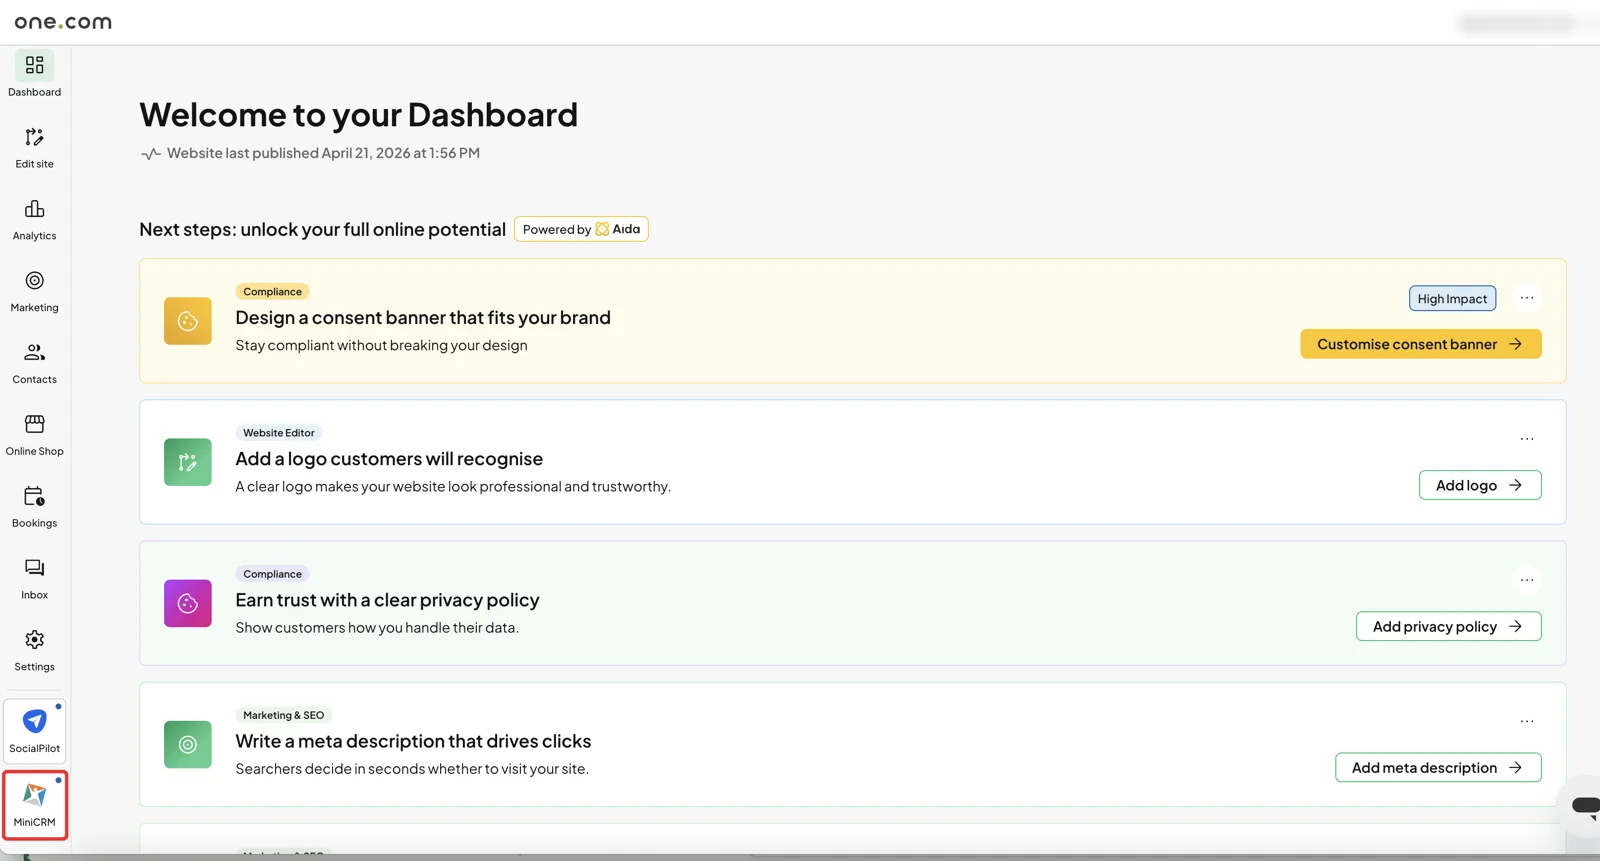
- Log in to one.com Website Builder and open the Dashboard.
- Click the MiniCRM icon at the bottom of the left menu. MiniCRM opens with your account ready.
From Webmail
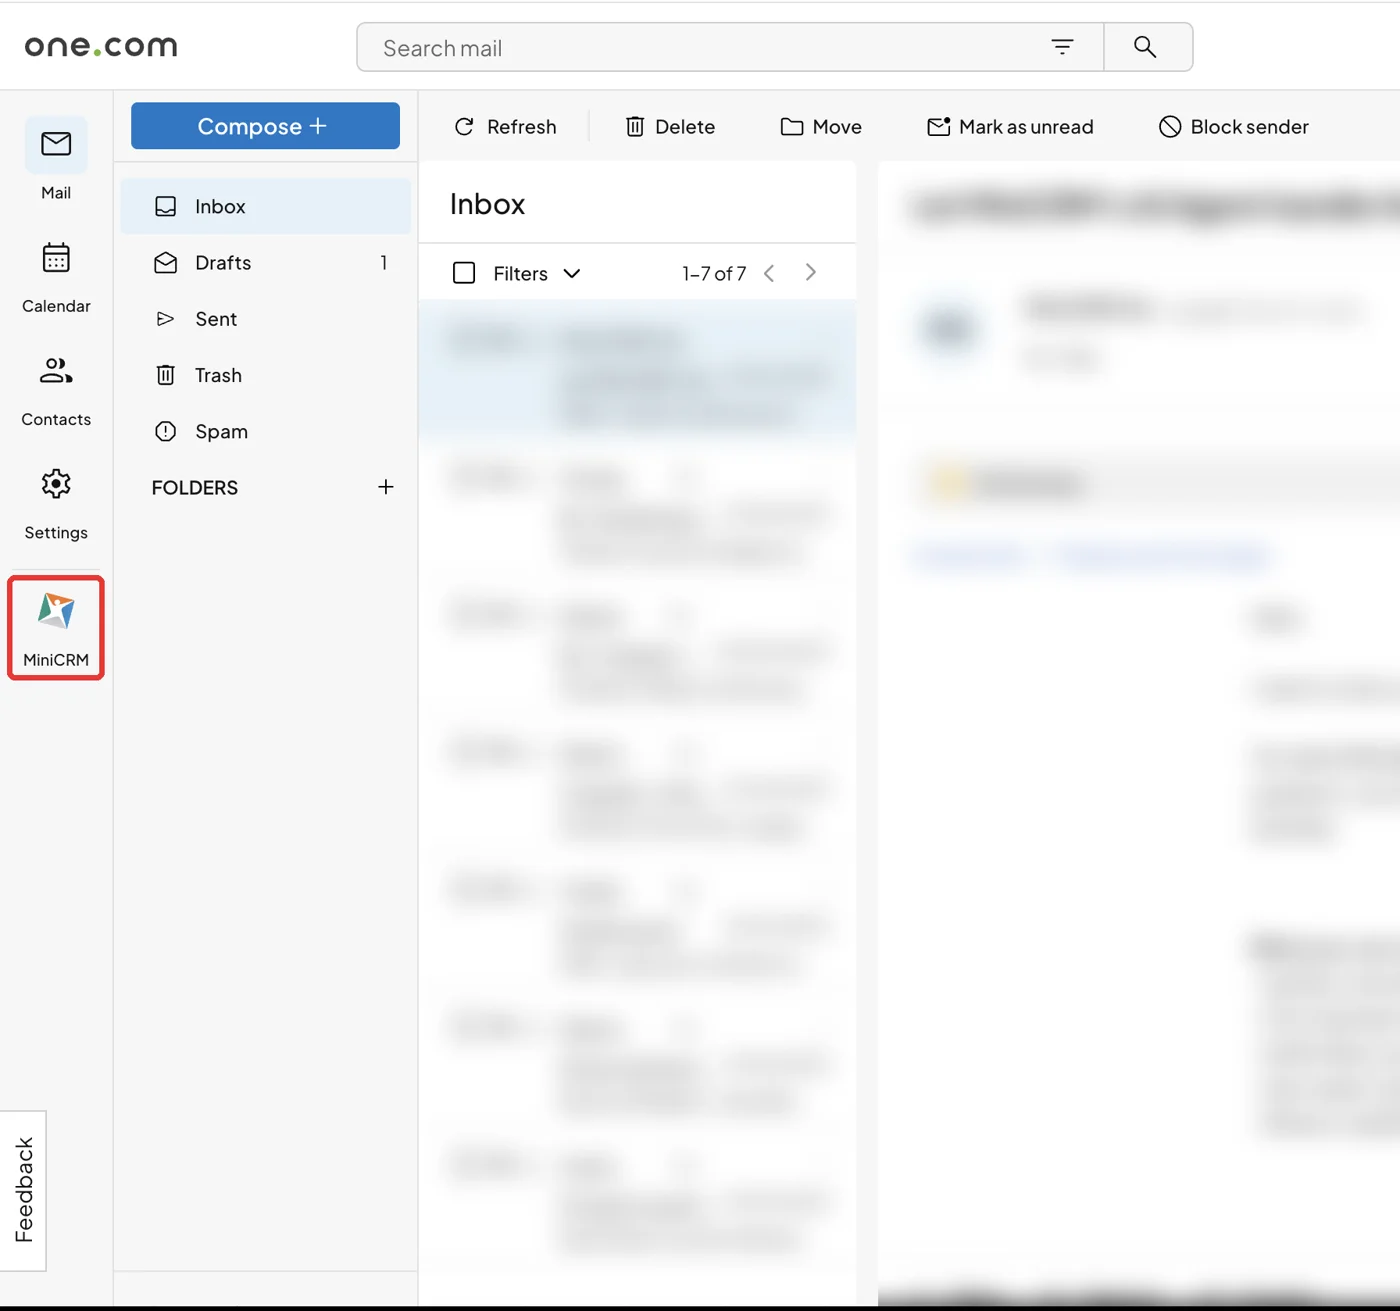
- Log in to one.com Webmail.
- Click the MiniCRM icon in the left menu, below Settings.
Step 2 – Export your contacts from Ubivox
You will end up with one CSV file that holds all your contacts and their data. Download it within 24 hours, because Ubivox deletes finished exports after that.
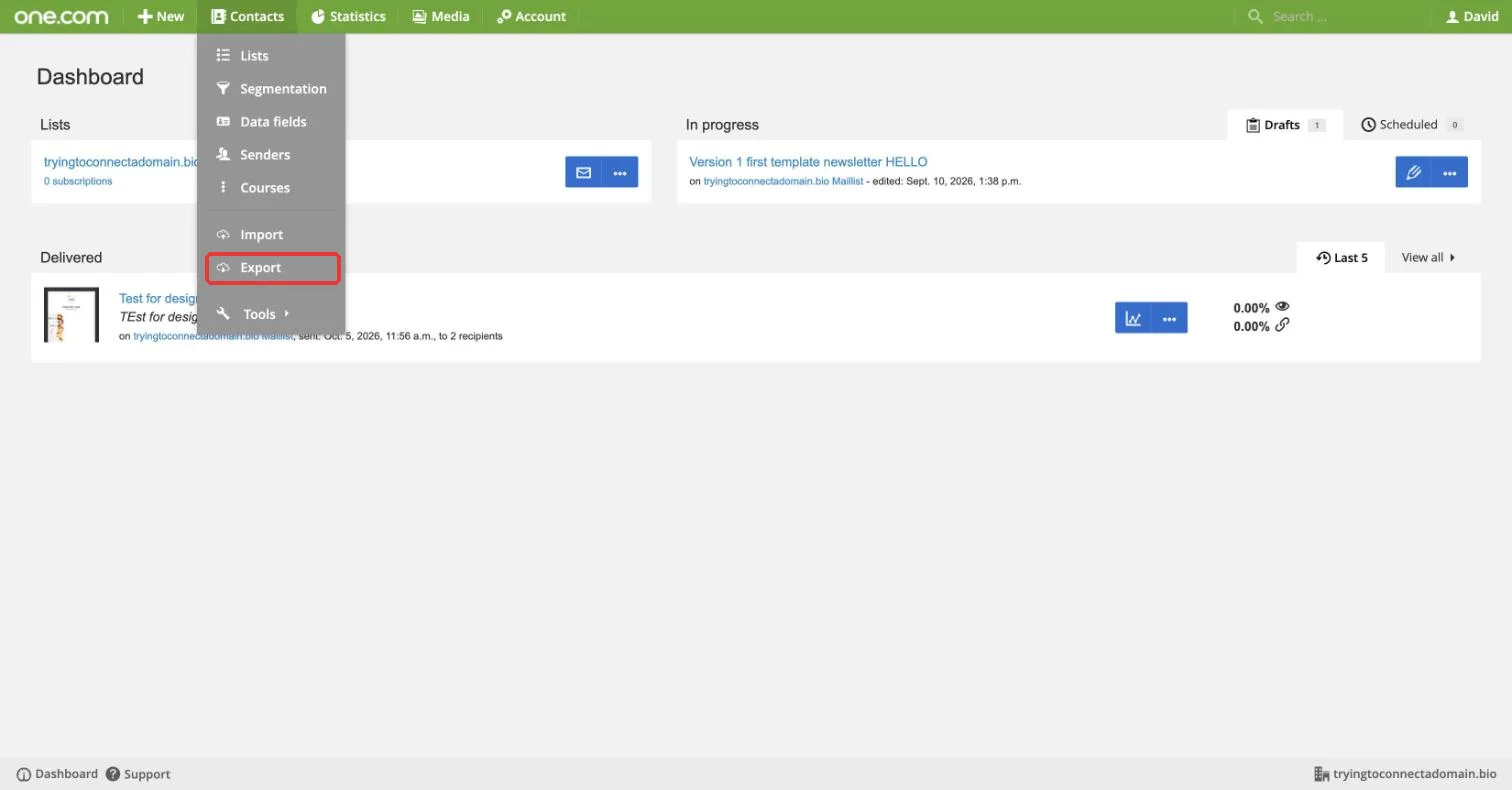
- Log in to Ubivox and open Contacts > Export.
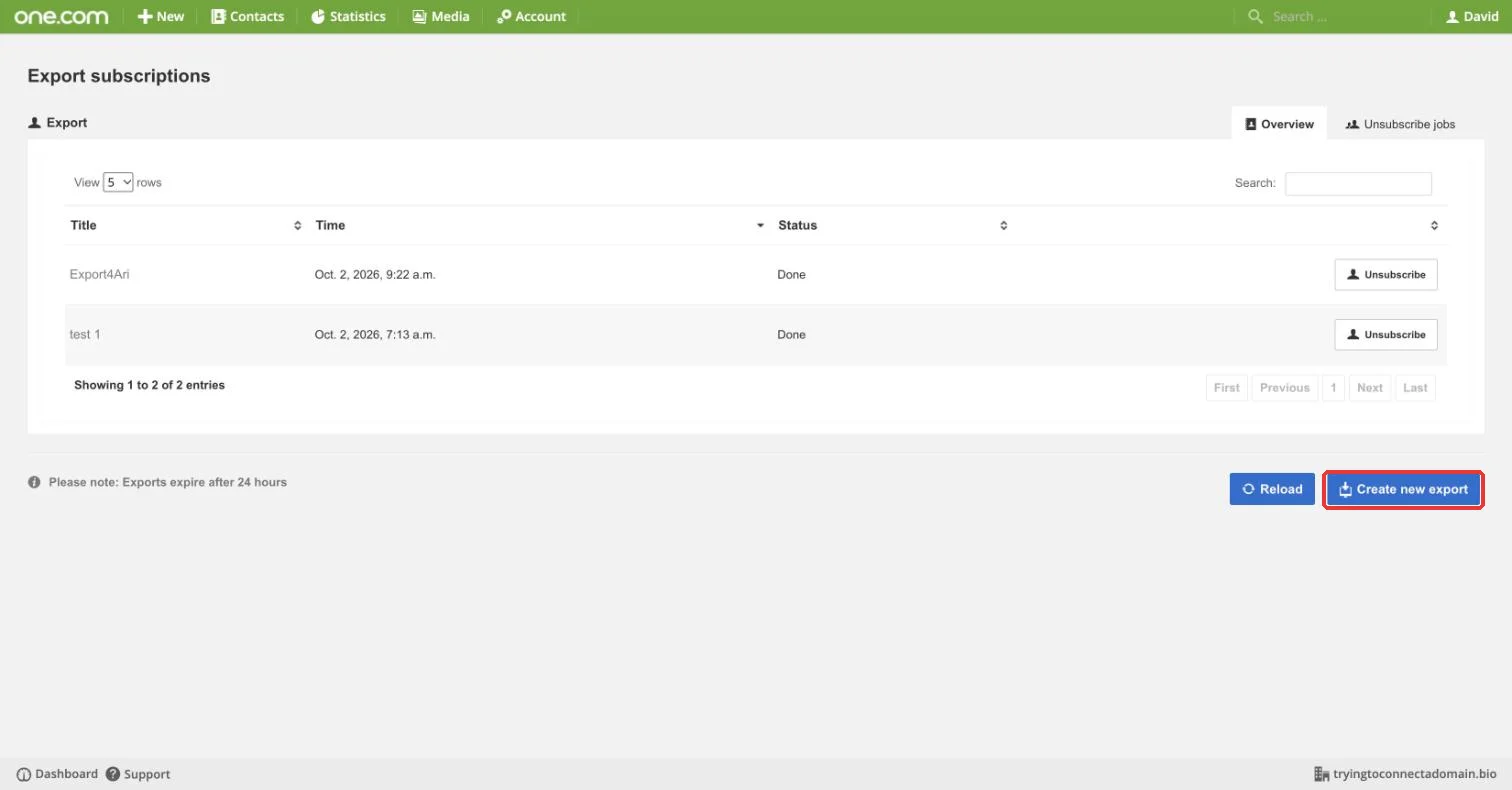
- Click Create new export (bottom right).
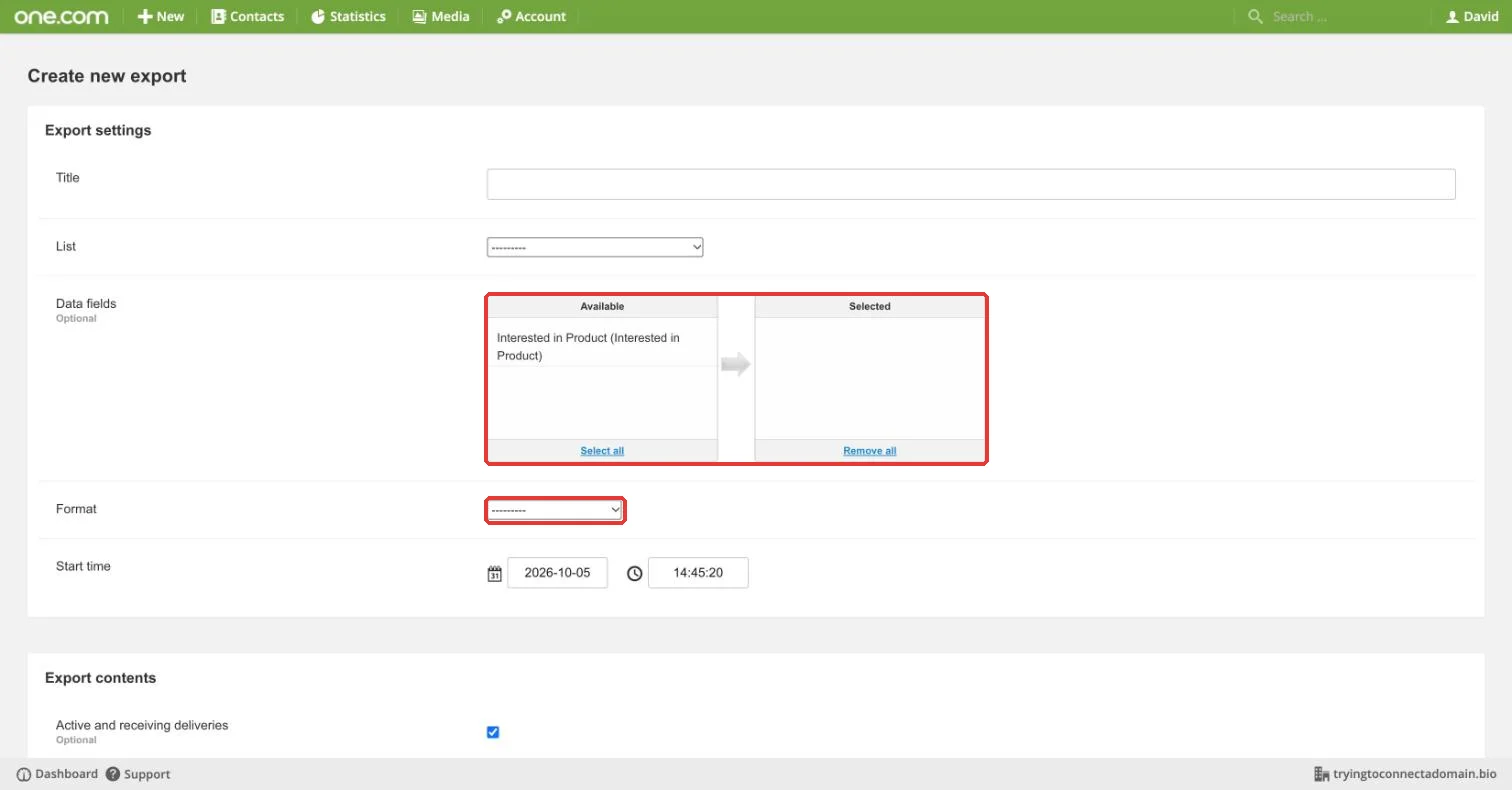
- Fill in the export form:
- Title: any name, for example “MiniCRM migration”
- List: pick your list (repeat the export for each list if you have several)
- Data fields: click Select all, so every custom field comes along
- Format: choose CSV
- Export contents: keep “Active and receiving deliveries” ticked. Leave unsubscribed contacts out unless you need them for your records
- Save the export, wait until its status shows Done, then download the file.
Check the file before you continue. Open it in Excel or Google Sheets and confirm it contains your contacts. Exports occasionally come out empty; if yours does, run the export again.
Step 3 – Note your lists and segments
Your data fields travel in the export file, and MiniCRM creates them for you during the import. Lists and segments don’t, so write them down now.
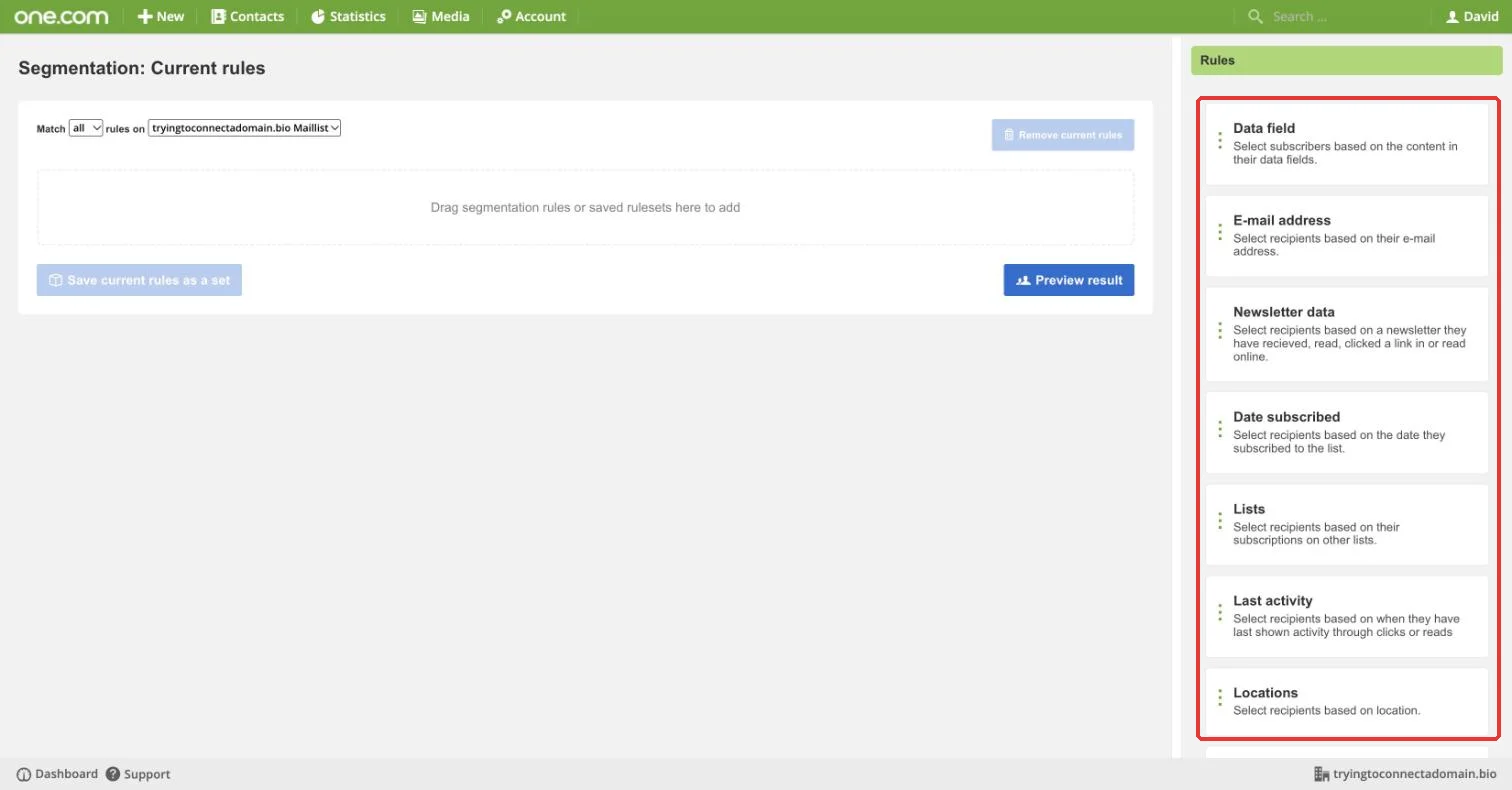
Open Contacts > Segmentation and Contacts > Lists in Ubivox and note the rules you use (for example “Interested in Product = Webshop”). You will rebuild them as saved filters in Step 5.
Step 4 – Import the CSV into MiniCRM
MiniCRM accepts .CSV, .XLS, .XLSX, .ODS and .ZIP files, so the Ubivox export works as it is.
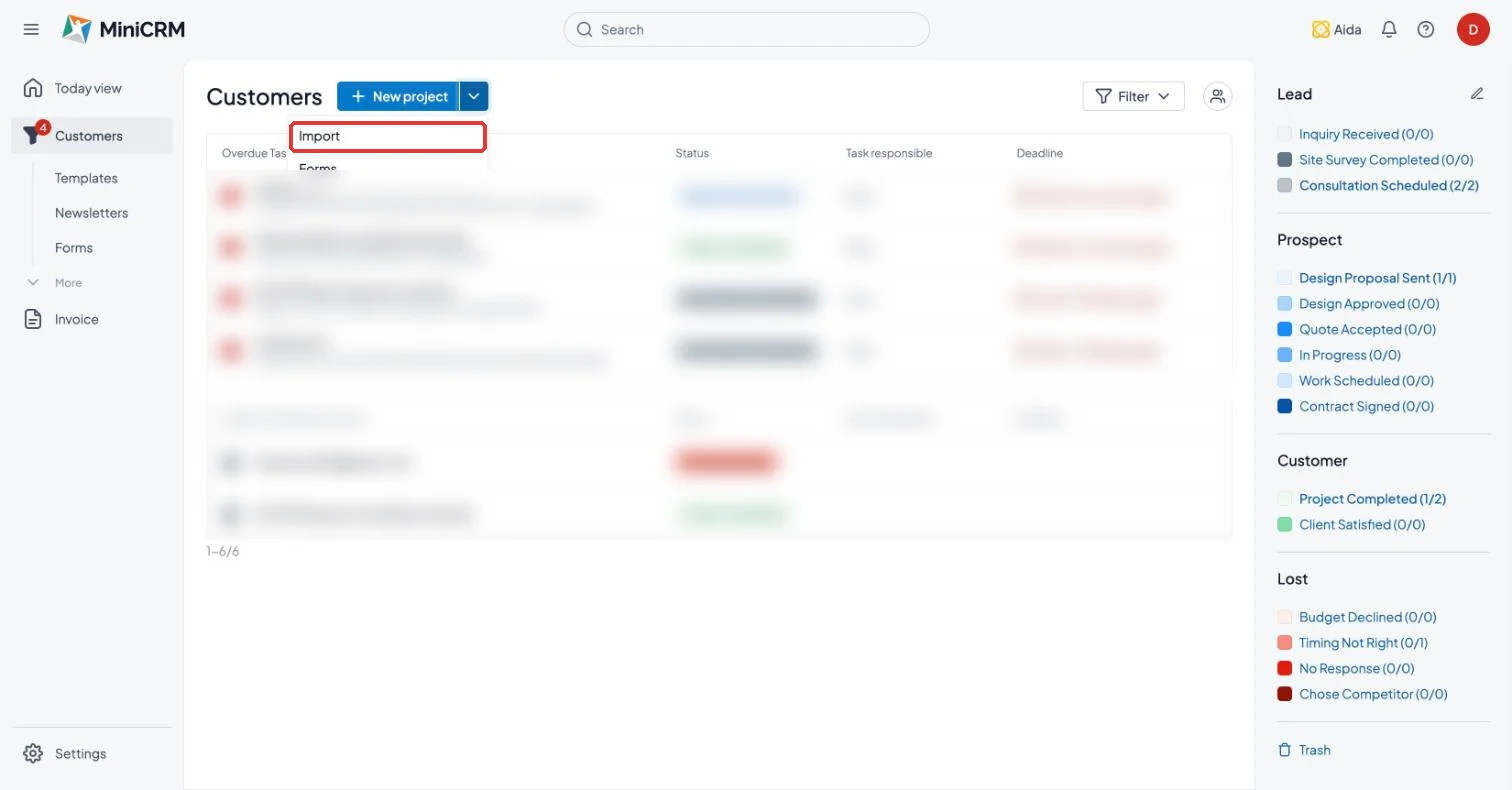
- Go to Customers, click the arrow next to New project and choose Import. (You can also reach it from Customers > Import in the left menu.)
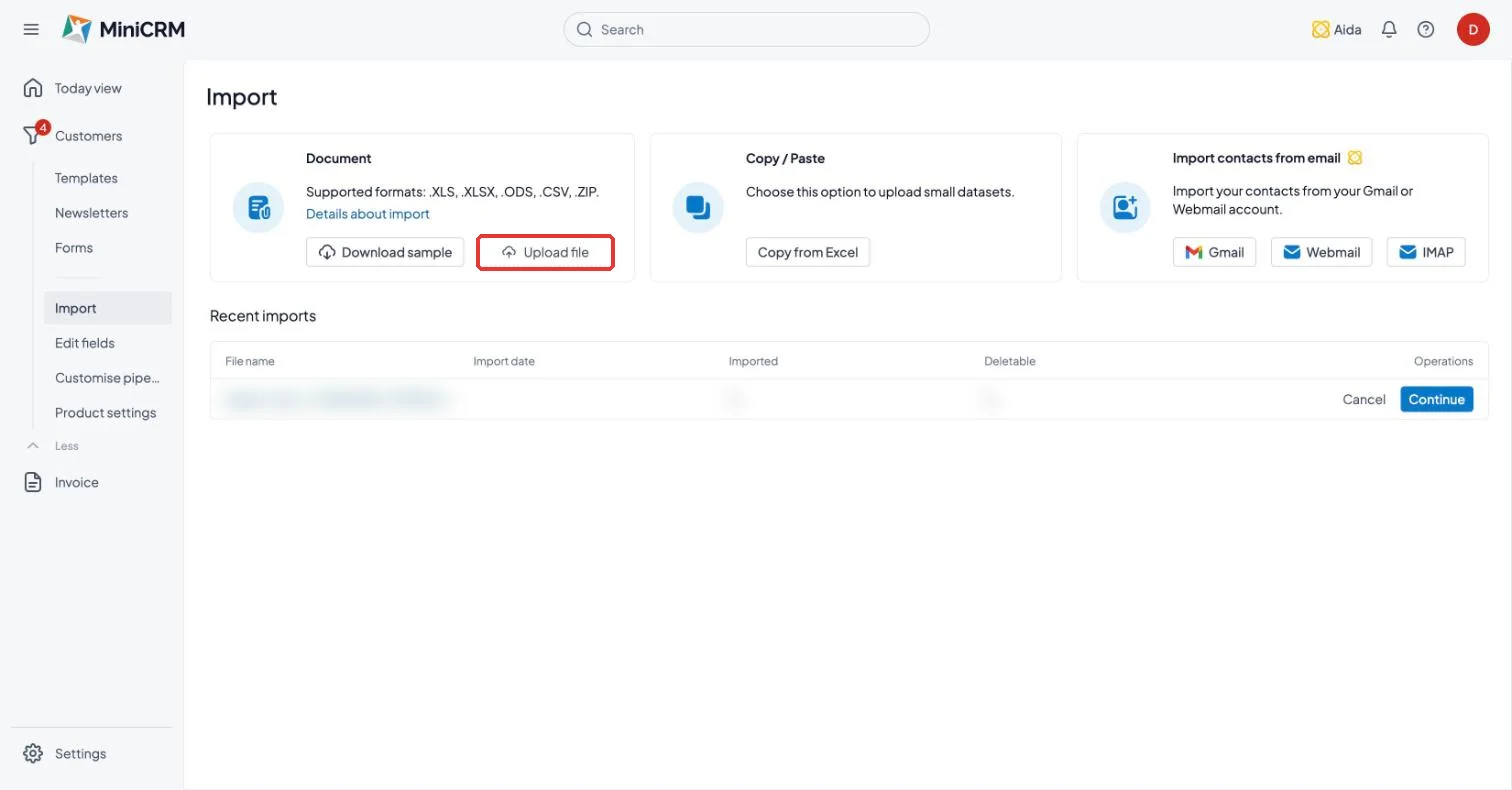
- Under Document, click Upload file and select your Ubivox CSV.
- Tick the spam declaration to confirm your contacts agreed to receive emails from you.
- Tick AI mapping. Aida matches each column to an existing MiniCRM field. For columns with no match, such as your Ubivox custom fields, it proposes a new field, for example “New field: Interested in Product (Checkboxes)”.
- Check the suggestions on the mapping screen. Keep a proposed new field, pick an existing field instead, or set a column you no longer need to “unknown”.
- Click Next, review the preview, then click Import.
Good to know: new fields are created as soon as you click Next on the mapping screen, even if you stop before the final import. Dropdown and checkbox options come from the values in your file; a column with more than 100 different values becomes a text field. You can rename or remove the new fields later under Customers > Edit fields.
When the import finishes, open a few customer records and check that names, emails and custom fields came through correctly.
Step 5 – Recreate your lists and segments as saved filters
A Ubivox list or segment becomes a saved filter in MiniCRM: a named set of conditions you can reopen and send to at any time.
- Go to Customers and click Filter > New filter.
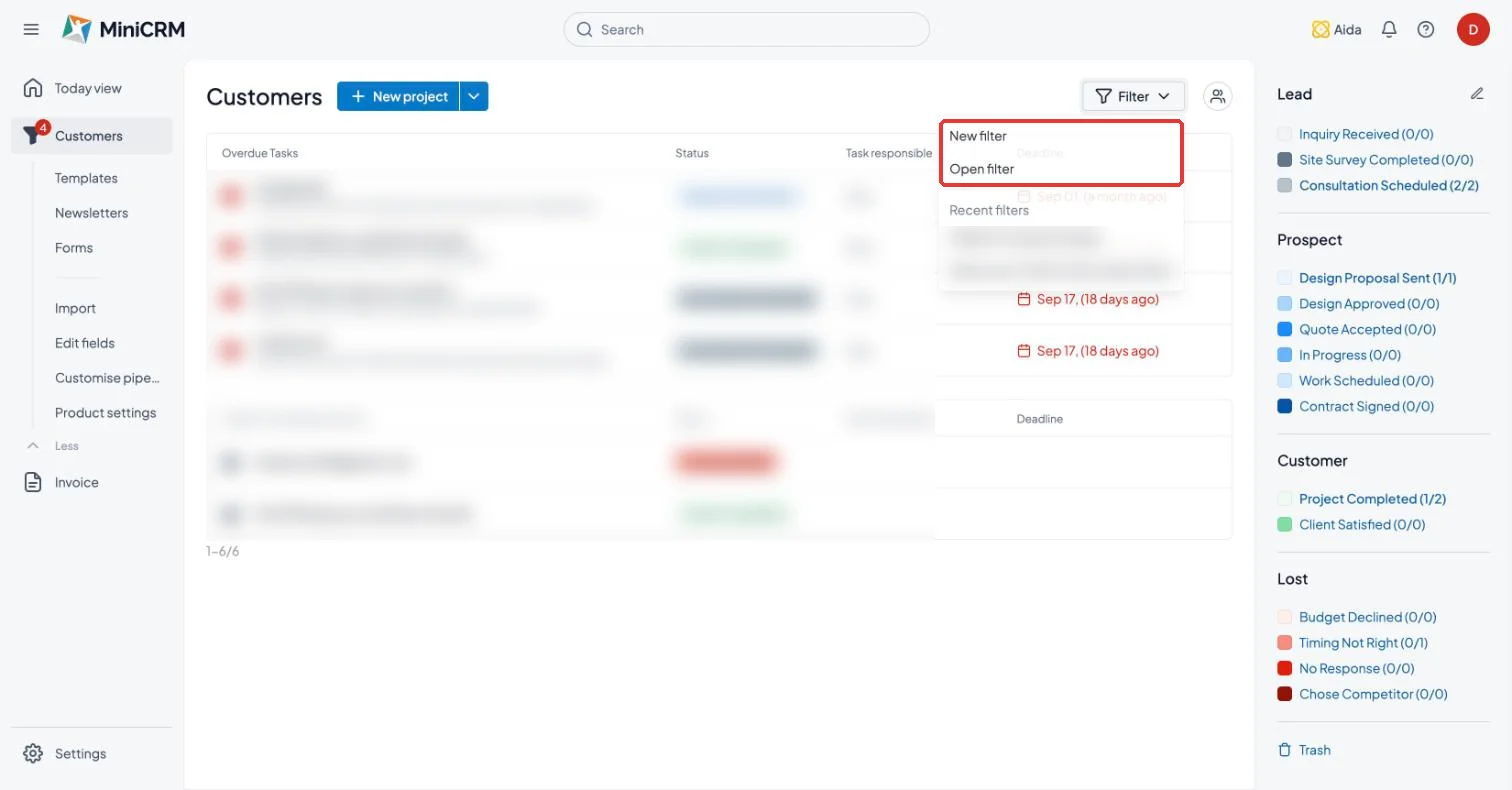
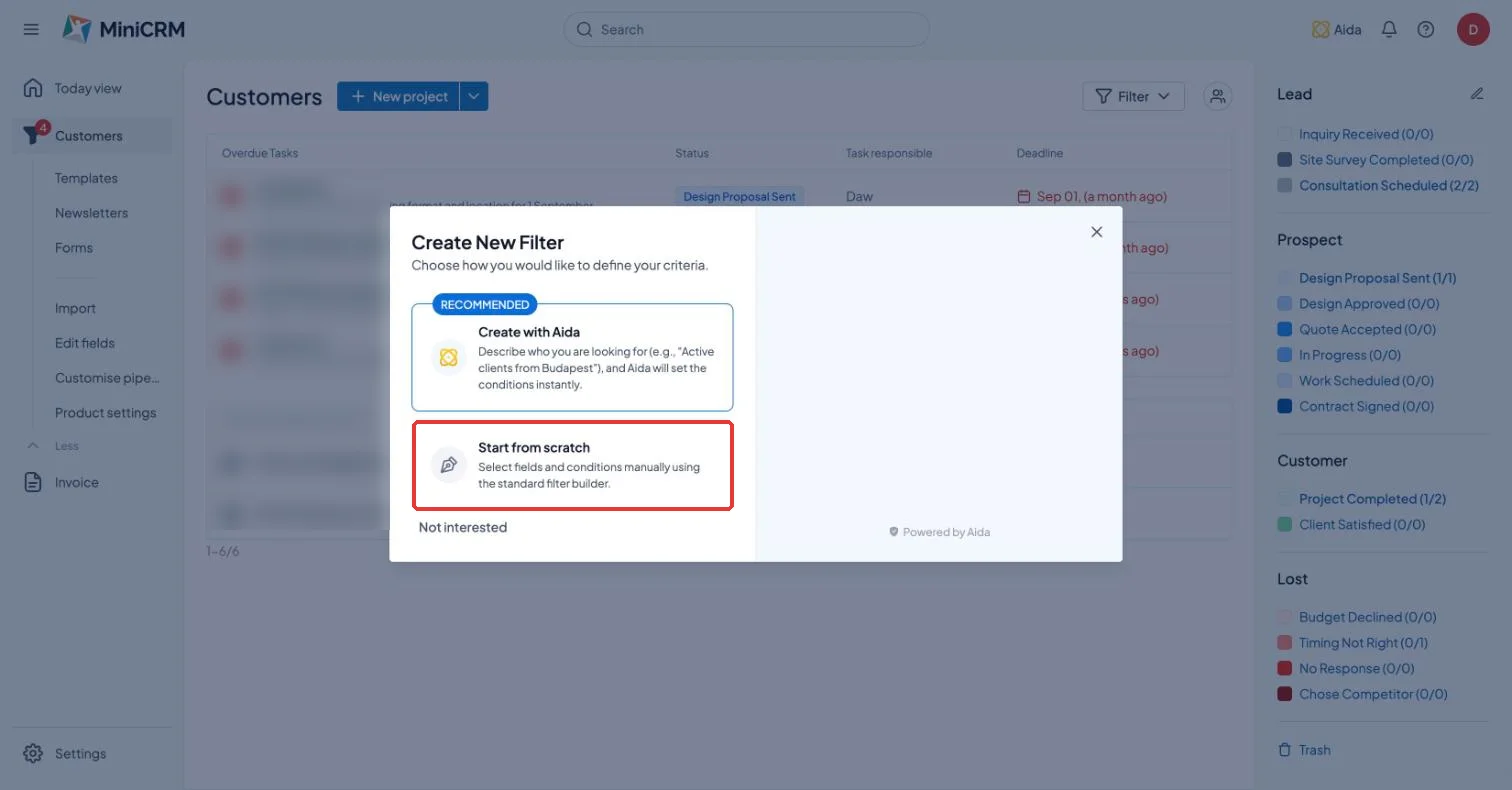
- Choose how to build it:
- Create with Aida (recommended): describe who you want in plain words, for example “newsletter subscribers interested in the webshop”, and Aida sets the conditions.
- Start from scratch: pick fields and conditions yourself, the same way you did in Ubivox Segmentation.
- Check the result list, then save the filter with the name of your old Ubivox list or segment.
Saved filters are always up to date: new customers who match the conditions appear in them automatically.
Step 6 – Connect your mailbox and set up your emails
MiniCRM sends your emails and newsletters through your own Gmail or Outlook account. Because Google or Microsoft deliver the message, there is no DKIM or DNS setup to do, your emails come from the address your customers already know, and they land in the inbox rather than spam. Every email you send also appears in your mailbox’s Sent folder.
- Click your profile picture (top right) > Profile > Phone & Email.
- Under Connect your email account, click Gmail or Outlook and sign in to approve the connection.
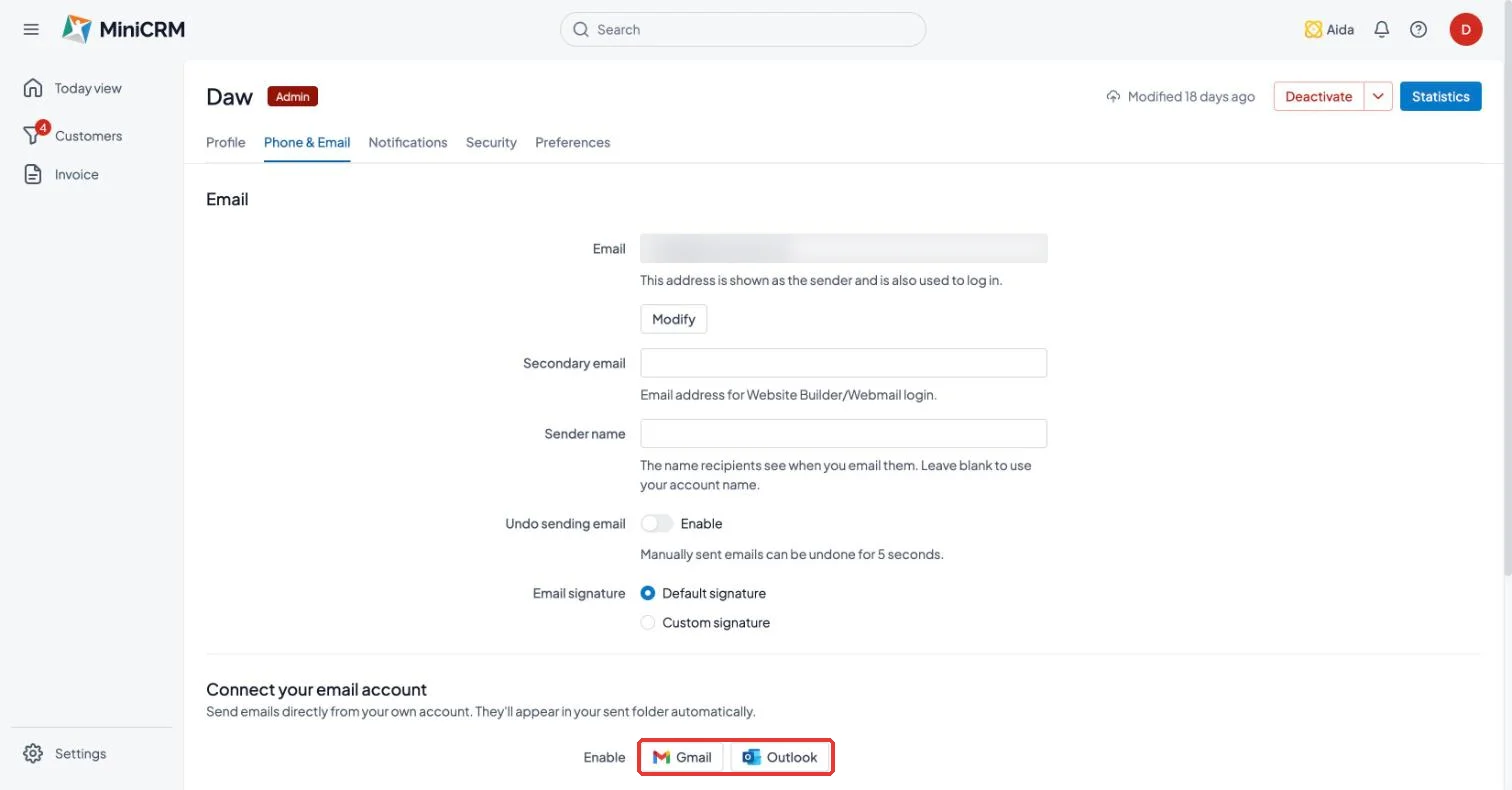
Newsletter sending switches on when you activate GoBIG in Step 7.
Good to know: sending volume follows your Gmail or Outlook plan’s daily limits, so very large one-off blasts may need to be spread across several days.
Rebuild your templates
Go to Customers > Templates and click New template to recreate your Ubivox newsletters and standard emails. Templates can include personal fields such as the customer’s name.
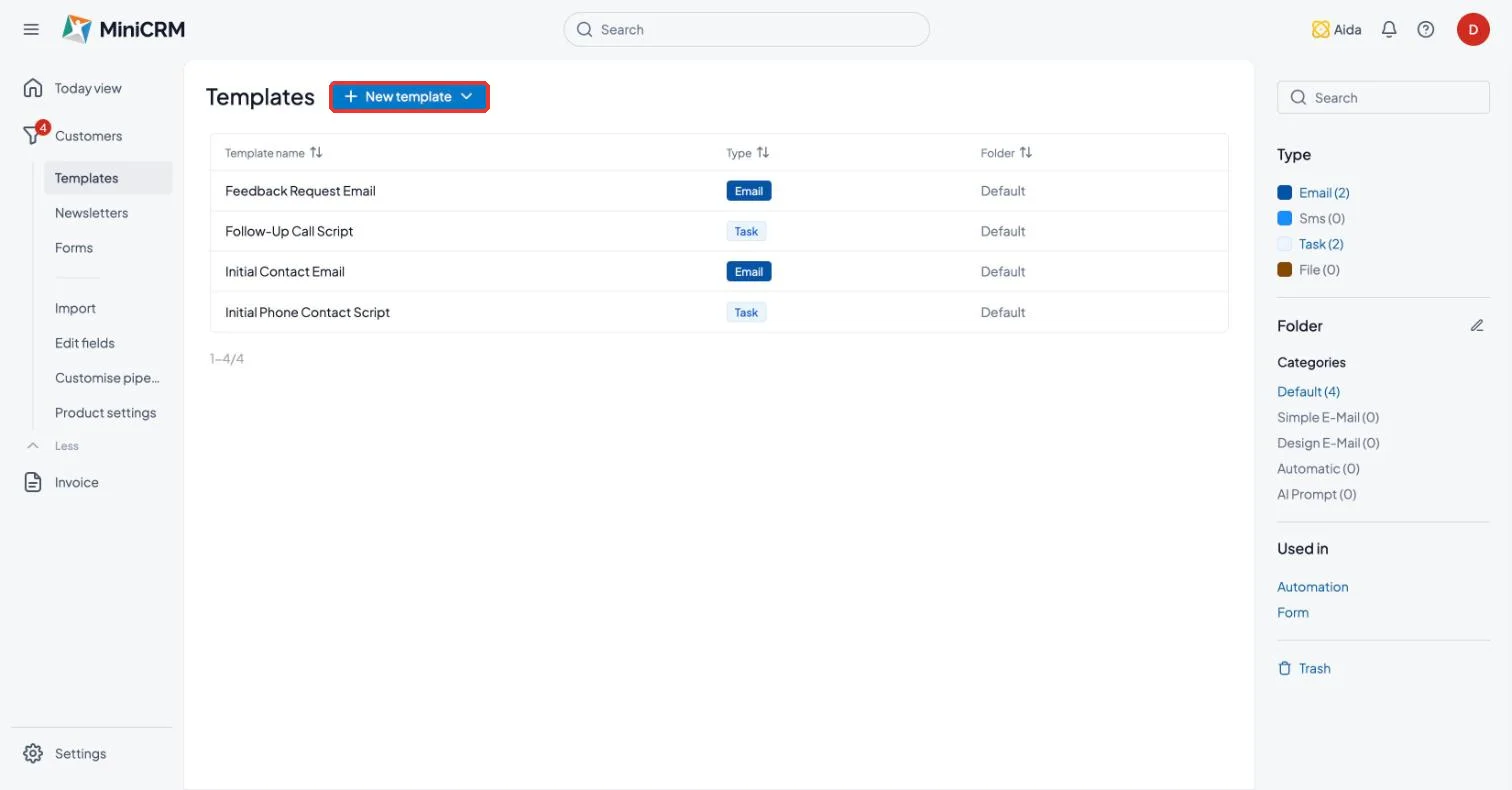
Replace courses with automations
Each Ubivox course (a timed email series) becomes one automation in MiniCRM. An automation can hold several steps, so the whole series, for example a welcome email, a follow-up 3 days later and a reminder after a week, fits into a single automation. See Automation basics for how to build one.
Step 7 – Activate GoBIG and send your first newsletter
Your contacts, fields, filters and templates are now in MiniCRM. One step remains: switching on newsletter sending.
- In MiniCRM, go to Settings > Subscription.
- Select GoBIG, choose Yearly to save 20%, fill in your billing details and place the order.
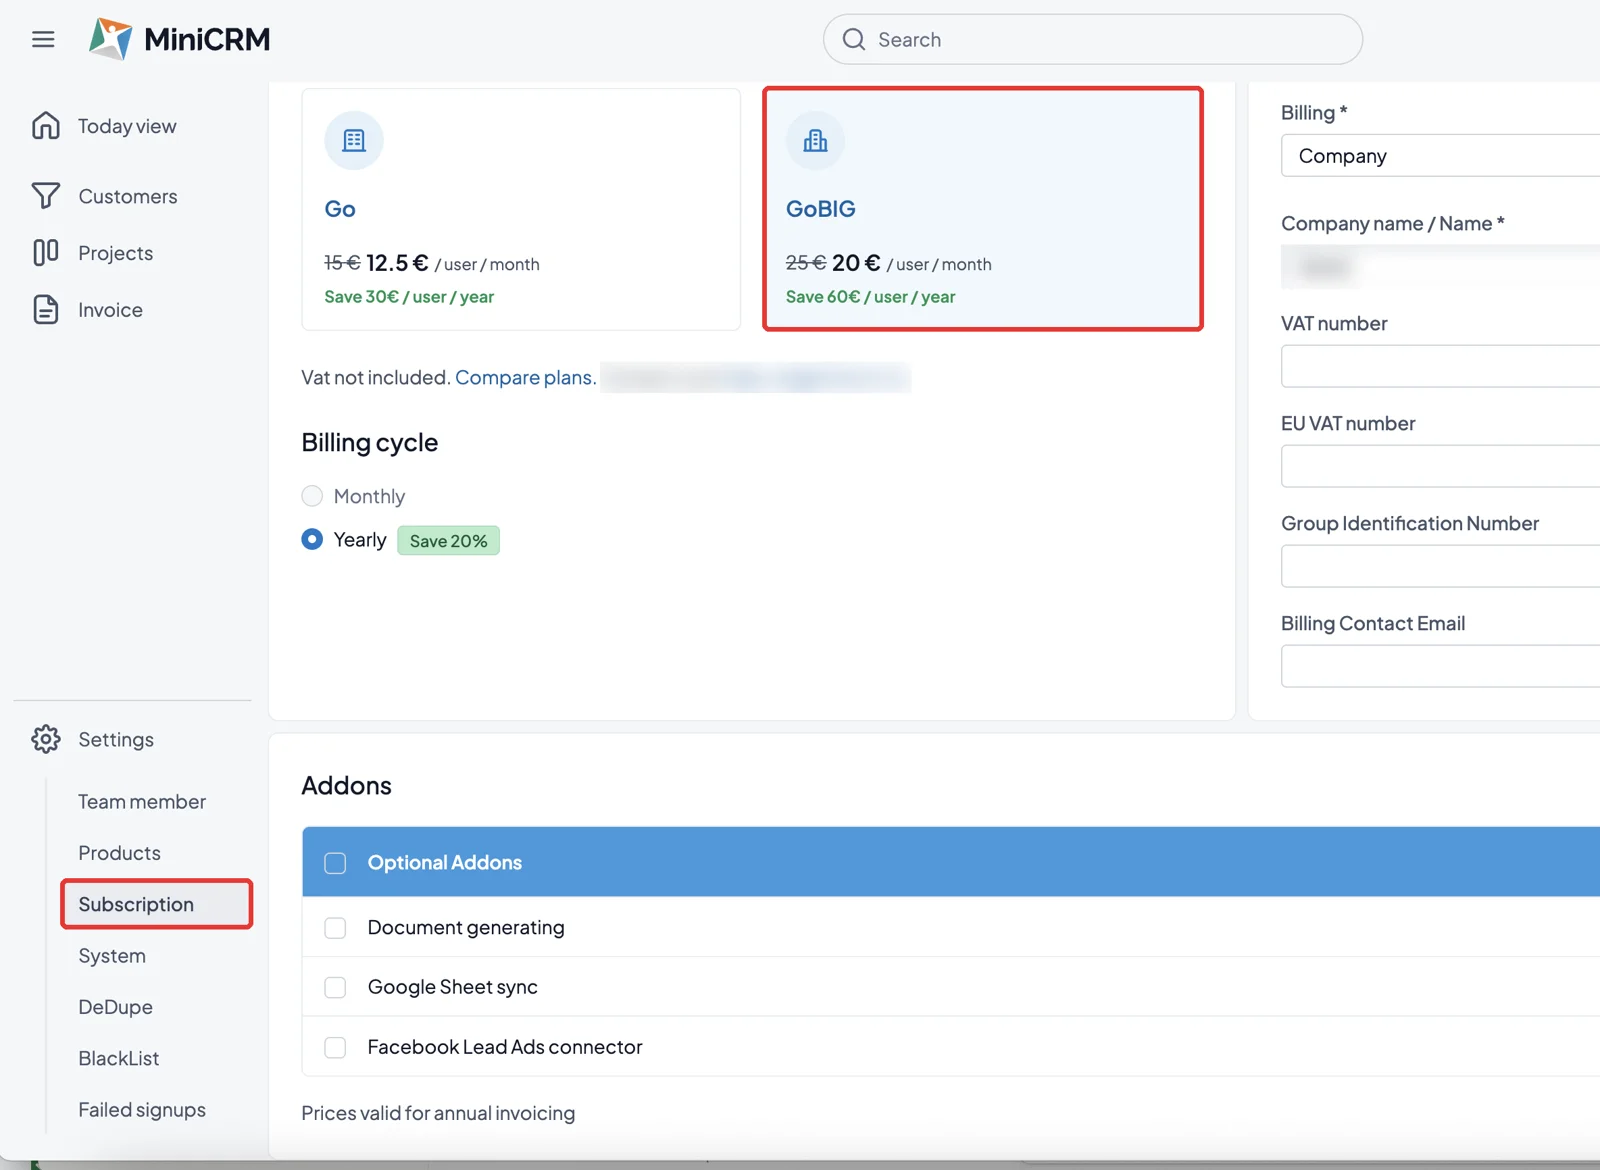
GoBIG costs €20 per user per month on the yearly plan or €25 month to month (VAT not included). Everything you set up in this guide keeps working, and your newsletters go out from your own mailbox from day one. Use Compare plans on the same page to see everything included.
Migration checklist
- Opened MiniCRM from Website Builder or Webmail
- Exported every Ubivox list as CSV and checked the files are not empty
- Noted my Ubivox lists and segments
- Imported the CSV with the spam declaration and AI mapping ticked
- Rebuilt my lists and segments as saved filters
- Connected Gmail or Outlook and recreated my templates and courses
- Activated GoBIG and sent my first newsletter
- Finished everything before 31 December 2026
Stuck on a step? Email MiniCRM support at go@minicrm.one and mention you are moving from Ubivox; we will help you through it.